
Statement Jewelry DIYs That Are One Of A Kind
Minimalist is the new black, so to become the Rachel Green amongst your friends, you’d need to pair together simple yet chic outfits. Often, these outfits are a combination of solid colors and very basic patterns. This style can seem a bit too ordinary and bland. One hack that most fashionistas give out is to accessorize. Unfortunately, accessories such as necklaces, bracelets, and earrings are rather pricey, especially if you’re looking for good quality. Therefore, cheaper alternatives such as DIY jewelry pieces are highly needed and much appreciated. When you make your accessories, they match your aesthetic perfectly. No more running around to three different costume jewelry shops to find the perfect pendant. In this article, we have 40 DIY jewelry projects that you can attempt, and if you succeed, your outfits will inspire new trends!
1. Geometric Necklace
Since minimalist style is a trend, let’s start off with a necklace that is exactly that – minimalistic. A geometrical necklace like this one is simple yet elegant and would go nicely with pretty much any outfit you put together.
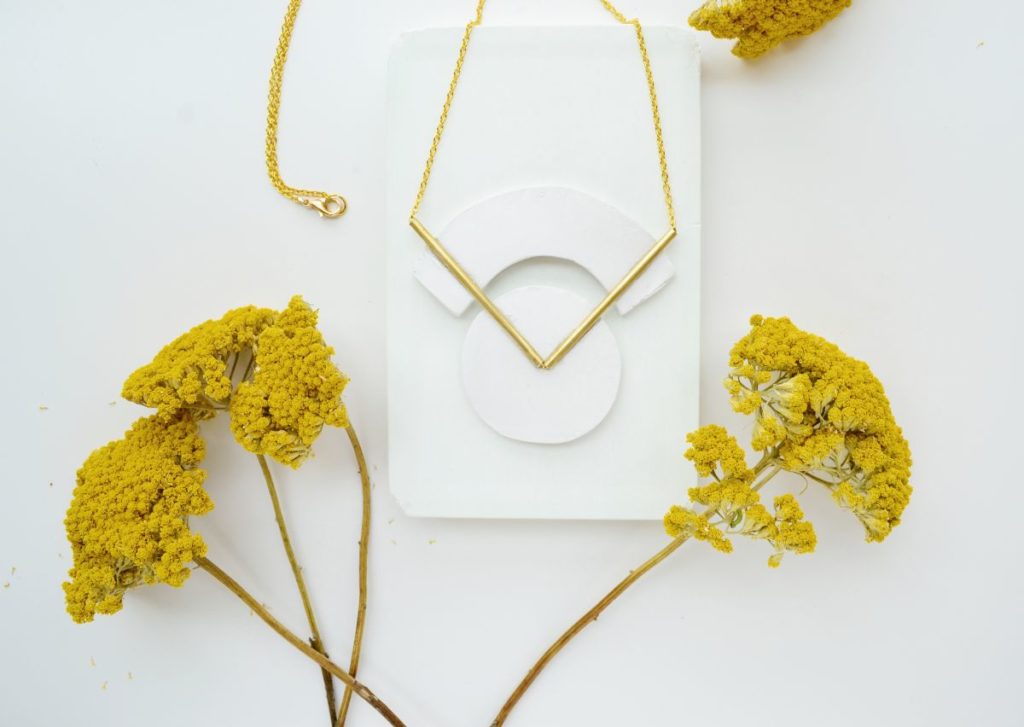
By using simple materials like brass and a chain, you’d be able to make this beautiful geometrical necklace in no time. Measure the desired length of the brass, cut the pieces, and position them into whatever shape you fancy. Finally, glue them in place and attach the chain.
2. Geometrical Clay Necklace
If you’re uncomfortable with using brass materials, we have another option for creating a unique geometric necklace for you. The elements on this necklace are made of polymer clay and painted with classic colors like black, white, and gold to add elegance.
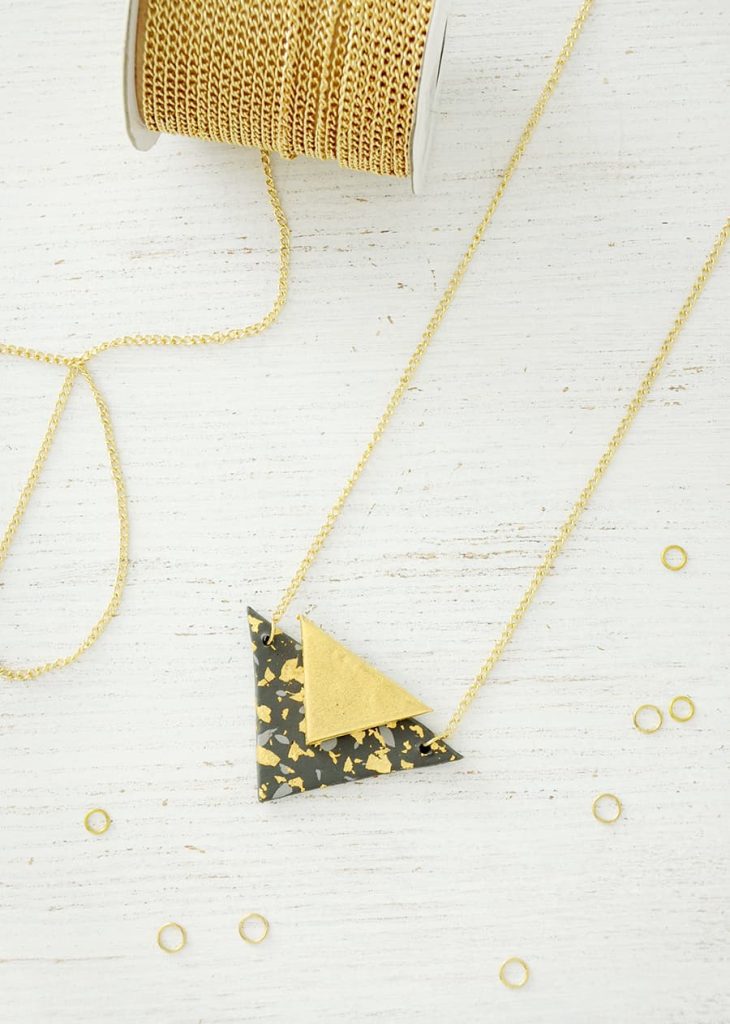
Roll a piece of polymer clay to about 1/8-inch thick. Then, drop tiny pieces and gold filament on the flattened clay and roll it out again. Next, cut the clay into shapes and smooth the edges. Finally, punch holes in the top and string a chain through it.
3. Clay Necklace
Clay can be molded into any shape and size, so there are numerous ways to create necklace pendants with it. Here is one simple yet extremely beautiful necklace idea to get you started on making your very own personalized version.
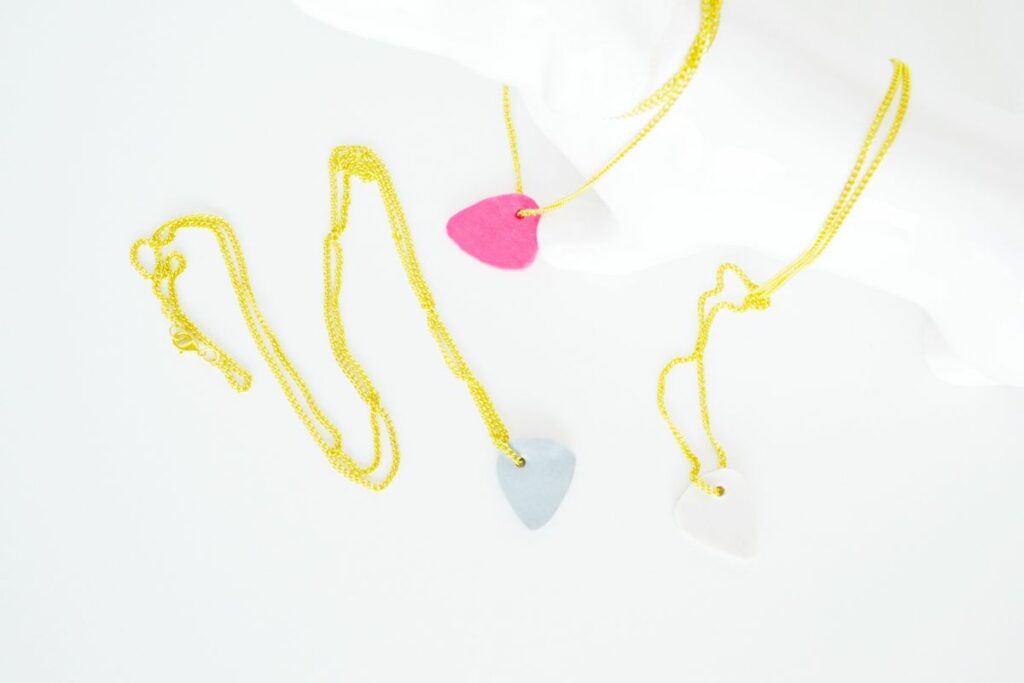
First, create templates; in this case, they chose a guitar pick. Then, cut the clay along the edges of your pattern; flatten the clay to your desired thickness and smooth the edges with your fingers. To finish, punch a hole at the top for your chain.
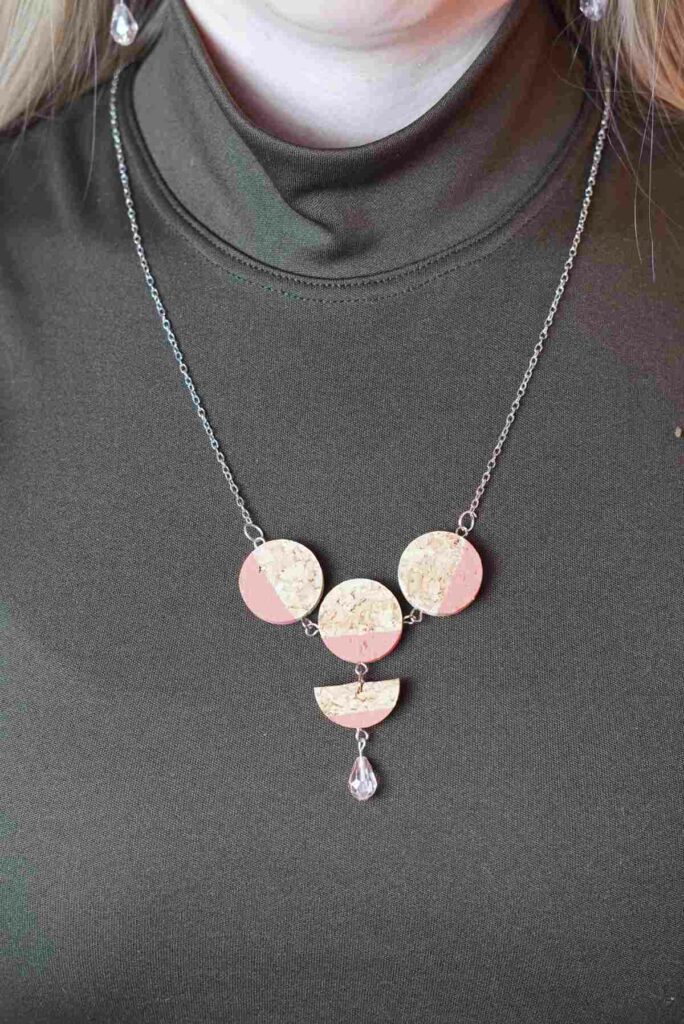
4. Half-Moon Stone Necklace
Alternatively, you could substitute geometric shaps for natural inspiration. Half-moon stone necklaces are equally elegant and minimalistic. If you have a boho style, we recommend it. This is the perfect gift for your nature-loving friends and family members as well!
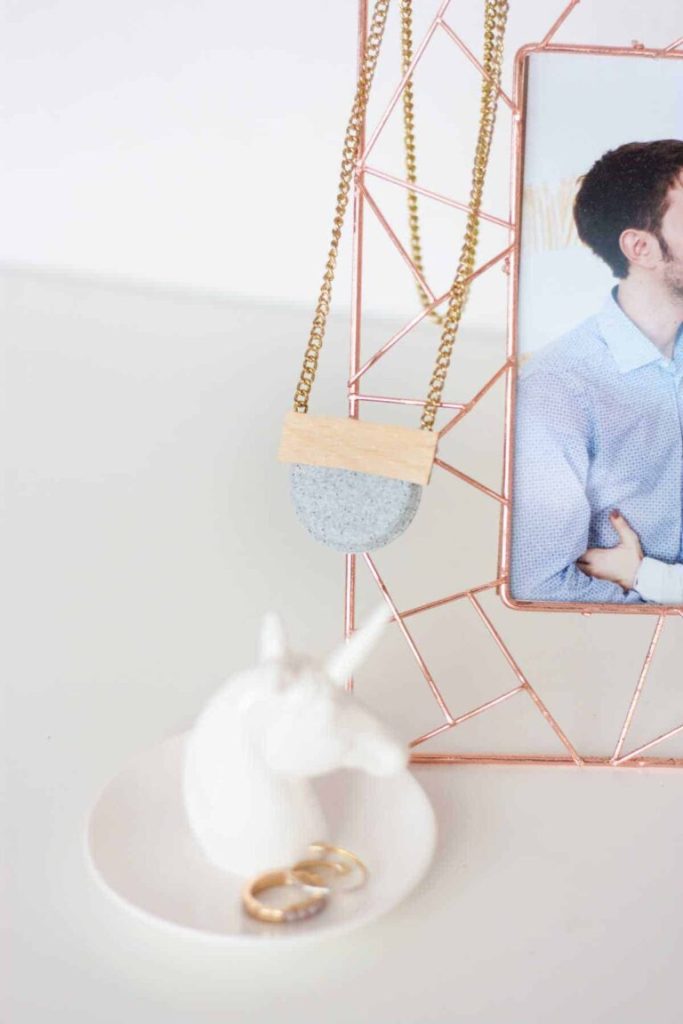
First, cut apart a wooden spoon or head to the craft store for the wooden rectangle. Then, create the half-moon shape with some oven hardening clay and bake at 30 mins at 110°c; use grayish clay if you want it to look more realistic.
5. Beads Necklace
Another minimalist necklace that you can try to DIY is a multi-strand beaded necklace; minimalist or not, it can still make quite the impact. It’s simple yet gorgeous and isn’t difficult to make, so put in some time and make this for yourself or as a gift to someone.
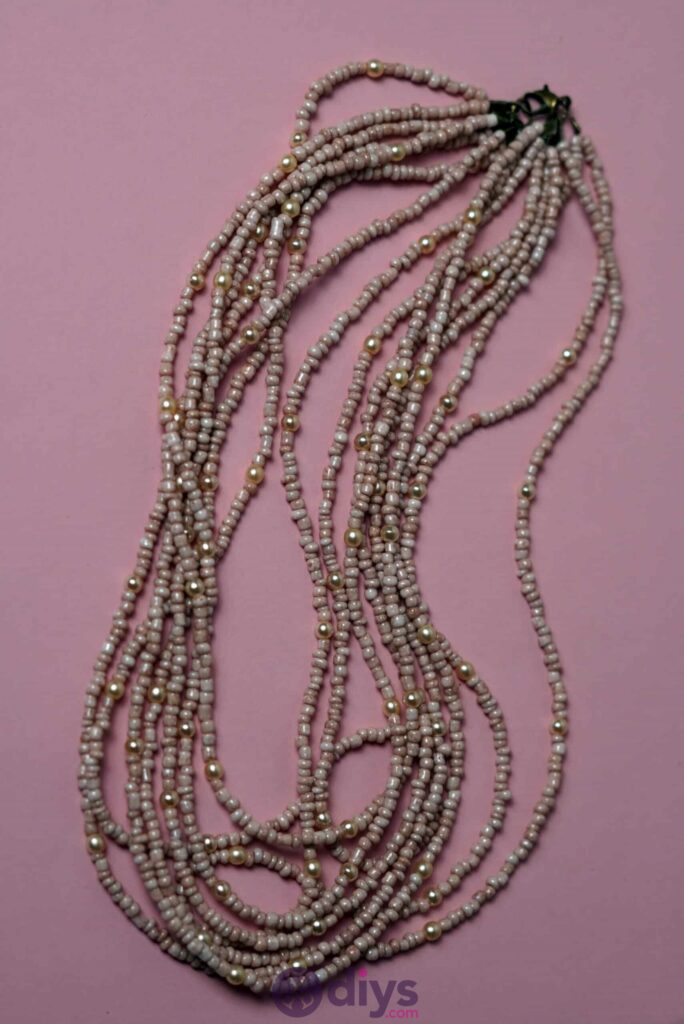
Cut two long pieces of string, tie one end of the two lines together. After you’ve done that, you can start beading; seed pearls and rose-pink porridge pearls are recommended for a gorgeous outcome. Finish off by “folding” the strings into as many strands as you’d like and attaching the clasp.
6. Ombre Brass Necklace
On the other hand, you could add a pop of color to an ordinary brass necklace, as we see done in this one. The ombre yarns take the brass necklace to a whole new level with the bright and vibrant colors that were missing.
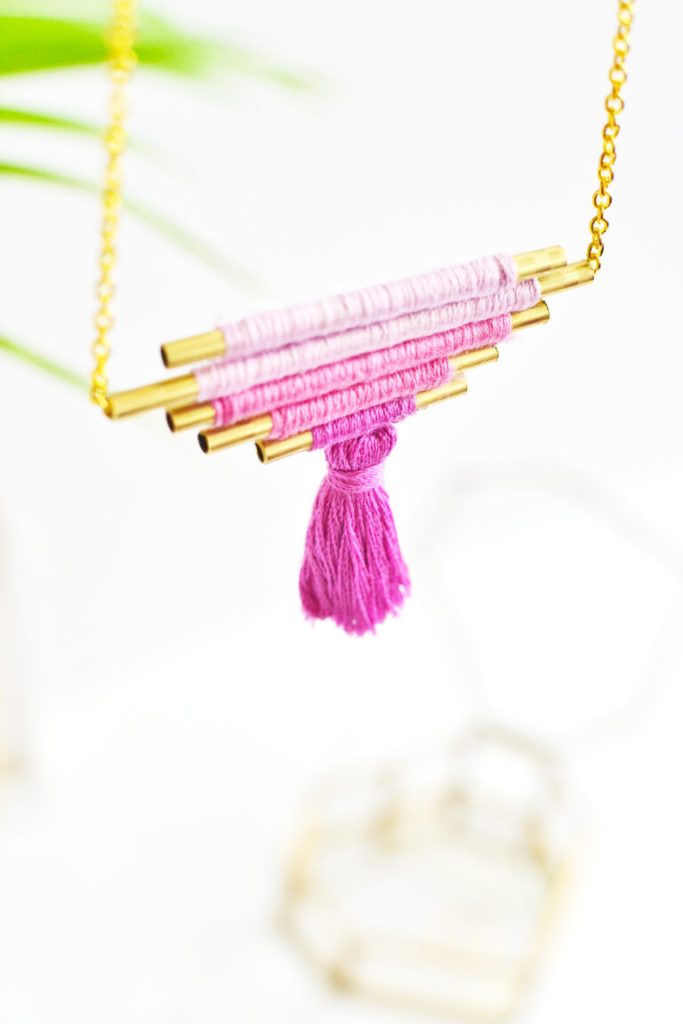
Start by cutting the brass in lengths of your preference and choosing string that would form an ombre effect. Then, wrap the yarn around the cut-out brass. Remember to arrange the colors from darkest to lightest and secure them in place with super glue.
7. Brass Necklace
Instead of a colorful brass necklace, you could create a simple one made of only brass, which gives off a rustic vibe. In addition to being rustic, this necklace is also minimalistic and beautiful to pair with any outfit that you have.
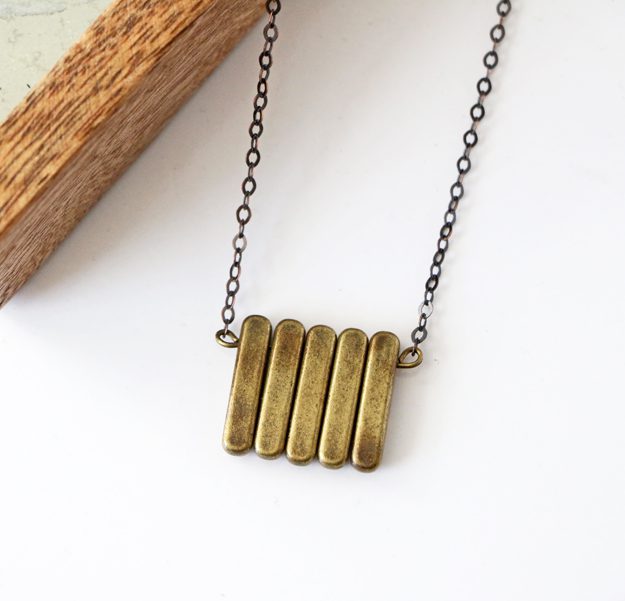
Simply run an eye pin through five long brass beads and trim down the excess wire sticking out, making sure to leave ¼ of the wire. Create a small loop with the leftover pieces and attach a chain to the pendant.”
8. Leather Tassel Necklace
If you don’t like a colorful tassel, opt for this leather one that looks so cool. This necklace makes a bold statement and looks classy with simple outfits, especially when the black tassel is paired with a classic gold chain.
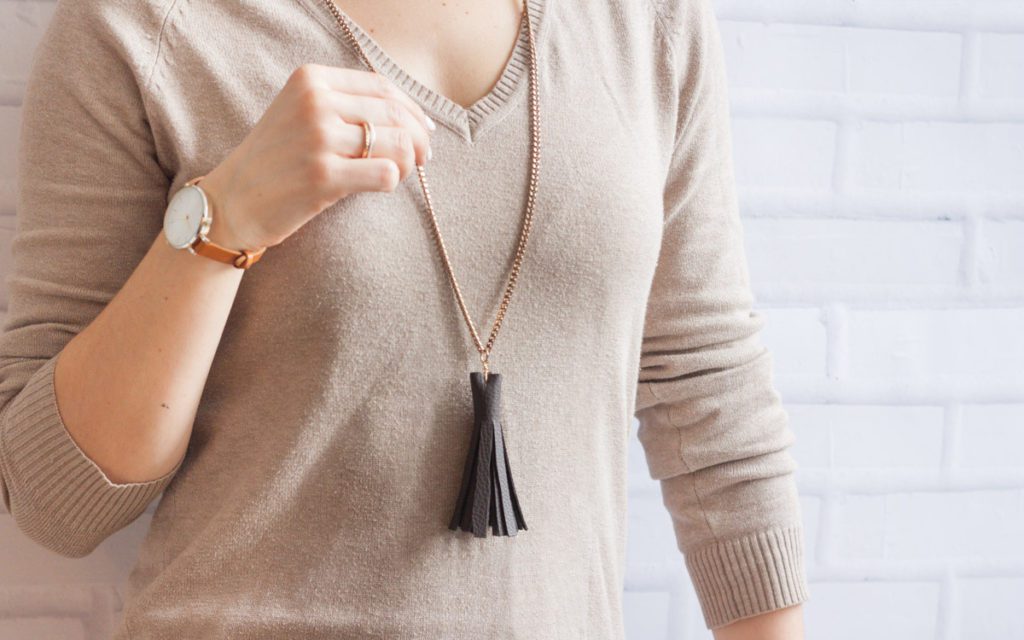
To create this gorgeous leather tassel necklace, cut a piece of leather roughly 3.14 inches x 4.7 inches; you could make it any size you like. Next, cut your fringes. To attach it to the chain, push a needle through it and insert the jump ring.
9. Pom Pom Inspired Necklace
This next piece is both colorful and bold; it involves bright pom-poms that make a statement and would be hard to ignore, especially on a simple outfit. There is much room for you to customize this necklace as you can choose the colors.
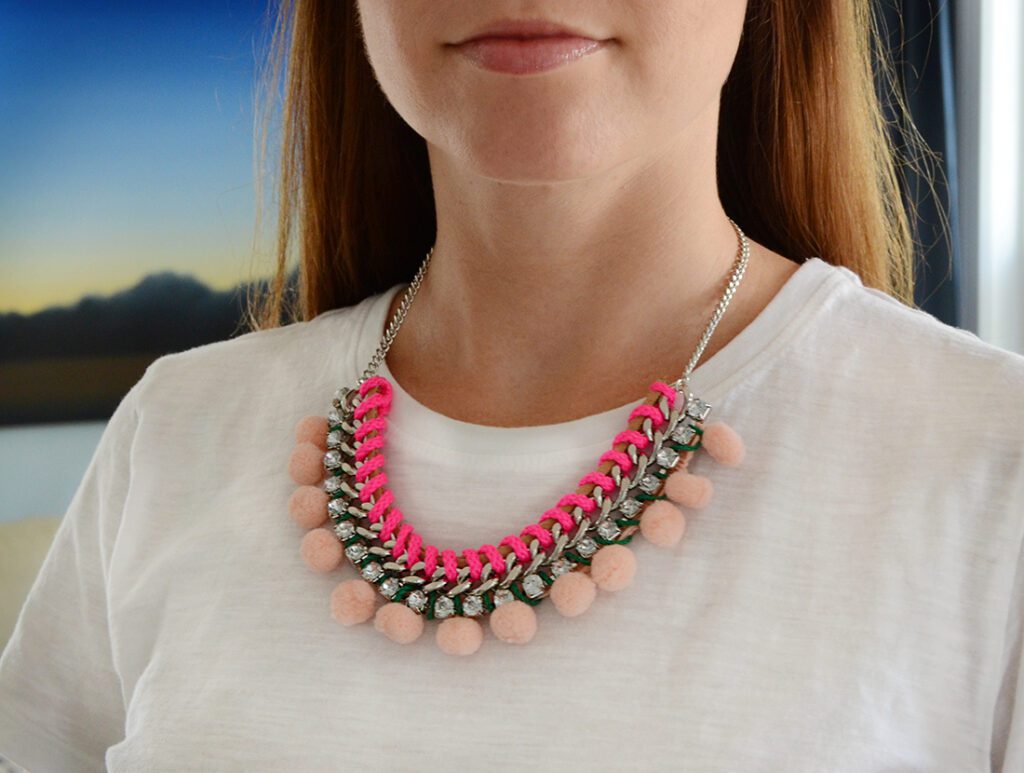
Begin by flipping your gemstone over, placing the pom-pom trim beside it, and tying a cord to secure the two in place; you could add glue to strengthen it further. Then, repeat the previous step with the suede cord. You can make this as layers as you wish.
10. Fringe Statement Necklace
Alternatively, create an incredibly bold fringe necklace that could be colorful or monochrome; bold because it makes a statement when you put it on. On another note, this is an environmentally friendly necklace as it reuses old fabric that you have.
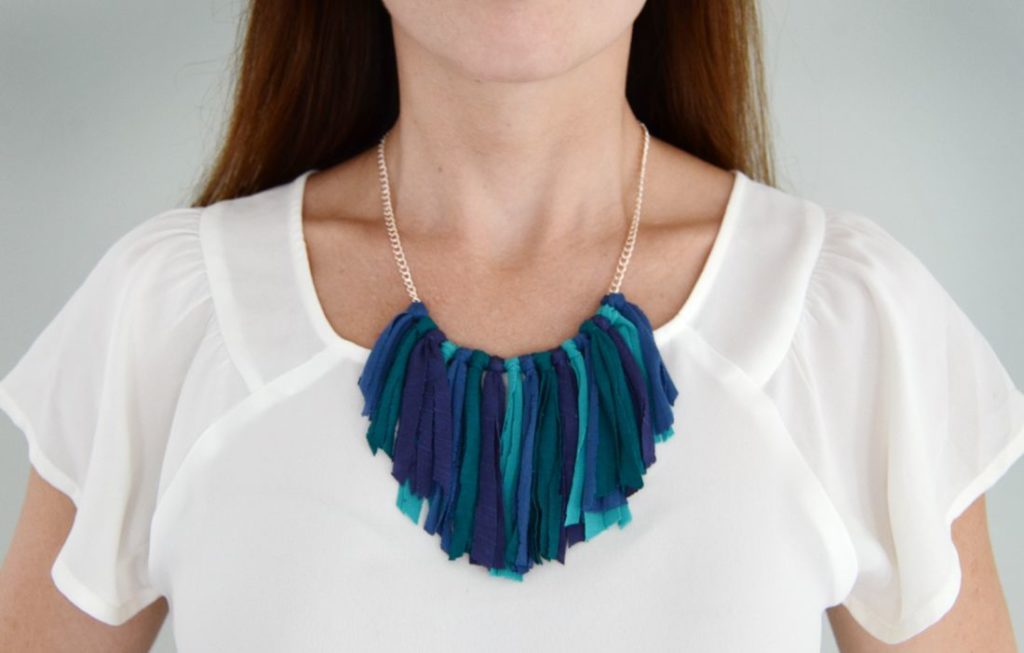
Gather some old fabric and cut it into strips of ½-inch x 8-inch. Then, using a larks head knot, tie them to a chain; you do this by folding the strip in half and slipping the folded end underneath the chain and through the loop. Repeat for the remaining pieces.
11. Brass Fringe Necklace
On the other hand, you could create a fringe necklace that doesn’t draw as much attention to its wearer. This piece calls for brass embroidery thread because it’s easy to string them through to create fringes, and the color makes it classic.
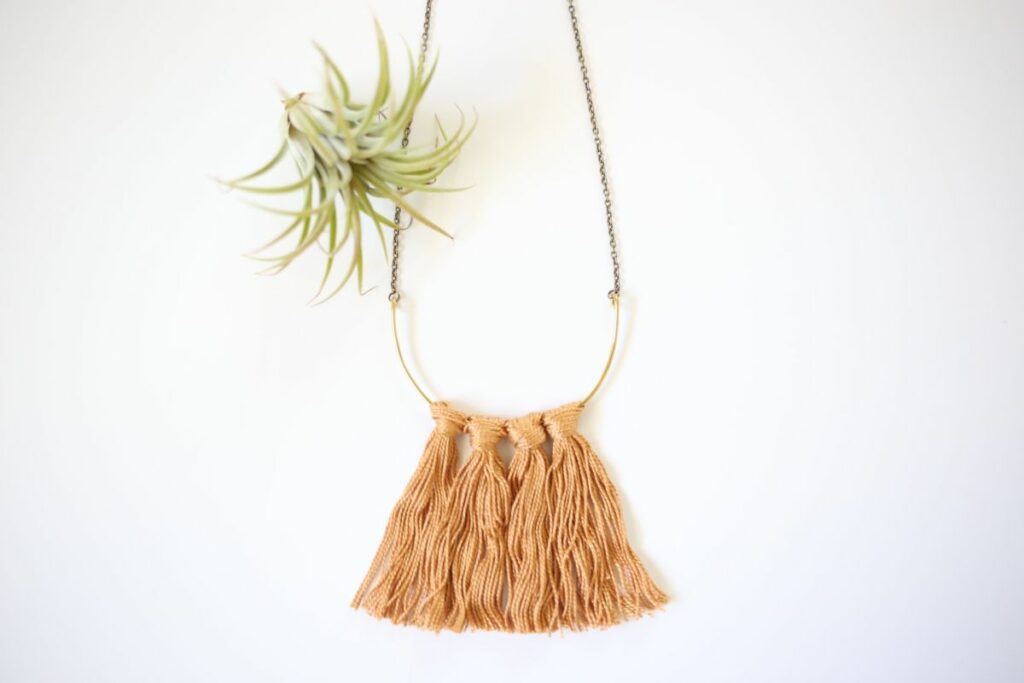
Start with a brass wire that is 6-inches and mold it into a semi-circle. Then, create loops on both ends of the wire. Using brass embroidery thread, create four bundles; use the larks head knot again (these are very common, as you can see already).
12. Colorful Tassel Necklace
You could also create a colorful tassel necklace to substitute the aforementioned embroidery jewelry. Similar to the above idea, you can control the size of this necklace as well; if you want a smaller pendant, then make a smaller tassel.
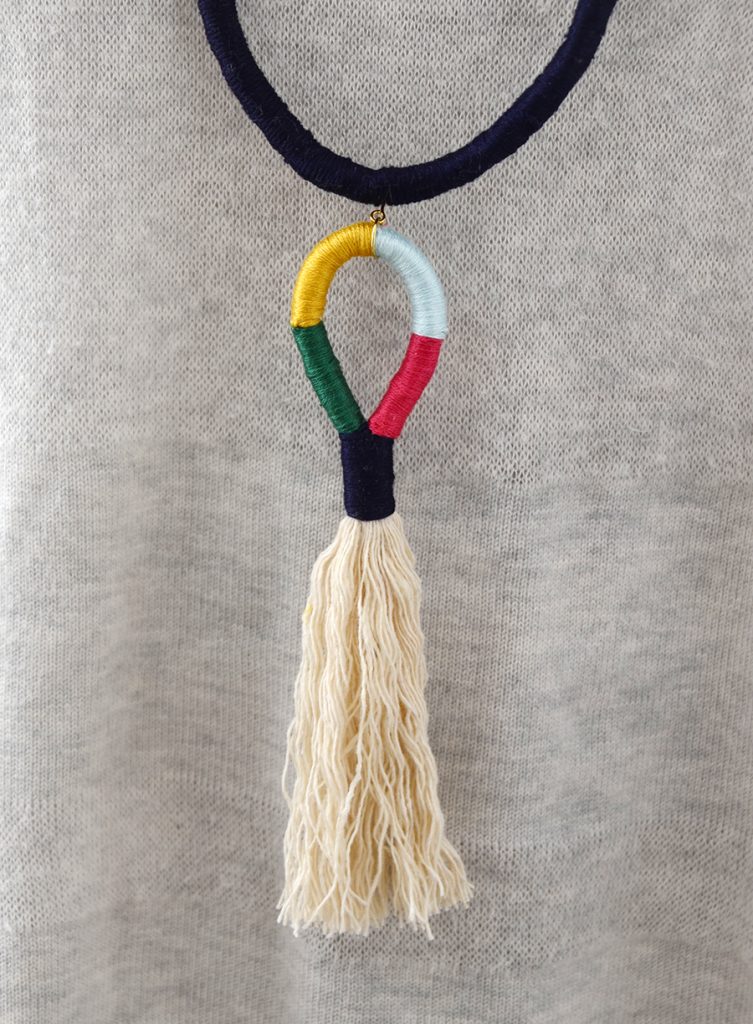
Using a 12″ piece of rope, tie the end of one color of your embroidery floss. Then, switch to another color and wrap again and repeat with the rest. Finally, fold the rope in half and tie that with the last color.
13. Embroidery Necklace
Another way you could add pizazz to your jewelry collection is with this colorful woven necklace. This takes up some time, but we promise you the process is satisfying, and the outcome is absolutely eye-catching, and it will add a bit of fun to anyone’s collection.
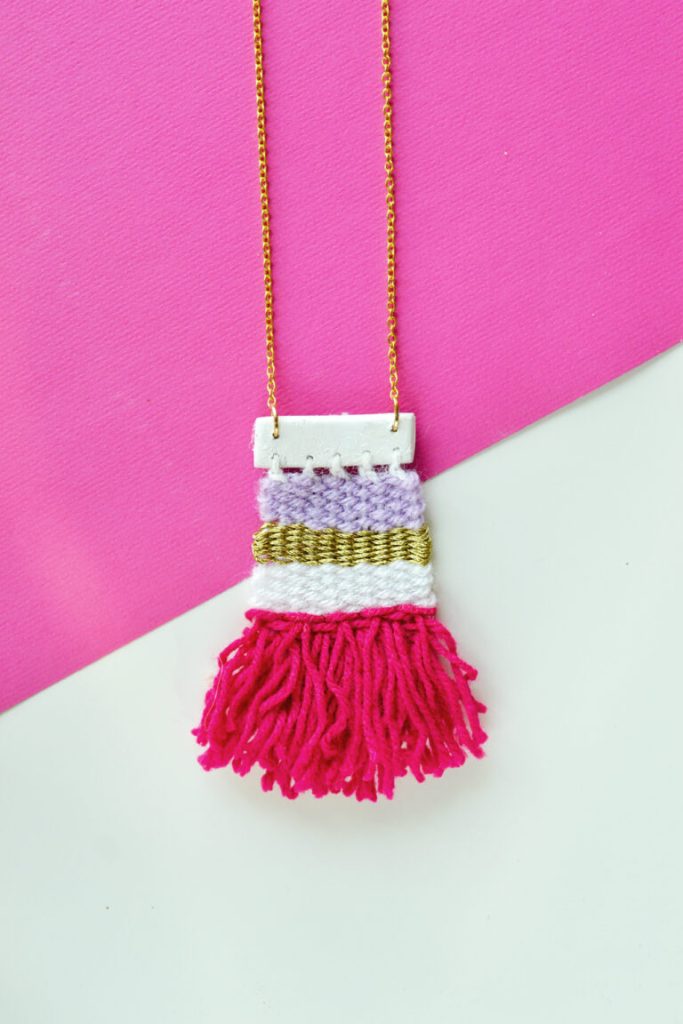
The only materials you need are assorted yarn, a chain, needle, a piece of cardboard, tape, scissors, keychain findings, clay, and pliers. Using the rya technique, patiently weave the “pendant” of your preferred size. Then, attach it to the chain.
14. Wired Heart Bead Necklace
Gentlemen, pay extra attention to this next necklace idea because it’s perfect as a gift for your partner to show them your love. It’s a wired heart beaded necklace that roughly translates to “my heart is full of love beads for you.”

Make the heart with a thick piece of wire and trim off any excess; try to make it symmetrical, but if it isn’t, it adds a lot of personality to it. Next, get some thin wire and thread it through some beads; before threading them, wrap it around one end of the heart first.
15. Wooden Triangular Necklace
One option for those who want an earthy element in their jewelry is a wooden triangular necklace. This necklace combines a wooden component with geometric shapes; as mentioned above, geometric features are simple. You can play with colors here too.
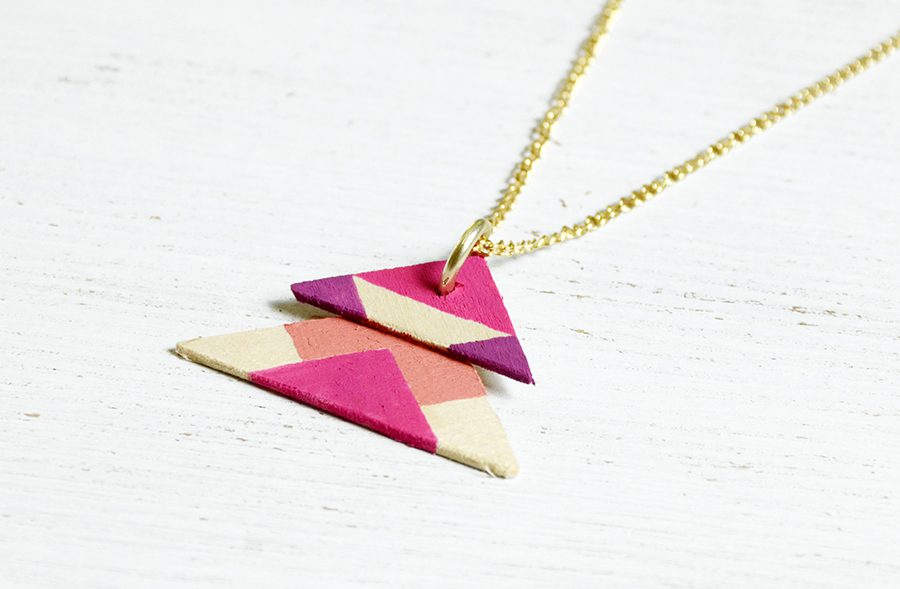
Go ahead and cut two triangles out of balsa wood and smooth the edges with sandpaper. Then, make a small hole on top of the triangle and dab some glue to attach a smaller triangle. Paint them and when they’re dry, connect them to the chain using jump rings.
16. Wooden Cube Necklace
Substitute triangles with little cubes. In comparison to most of the other DIY necklace suggestions we mentioned, this one is not that bulky, but this doesn’t make it boring one bit. Be warned that these wooden cubes are quite tiny, so hand painting them would take a steady hand.
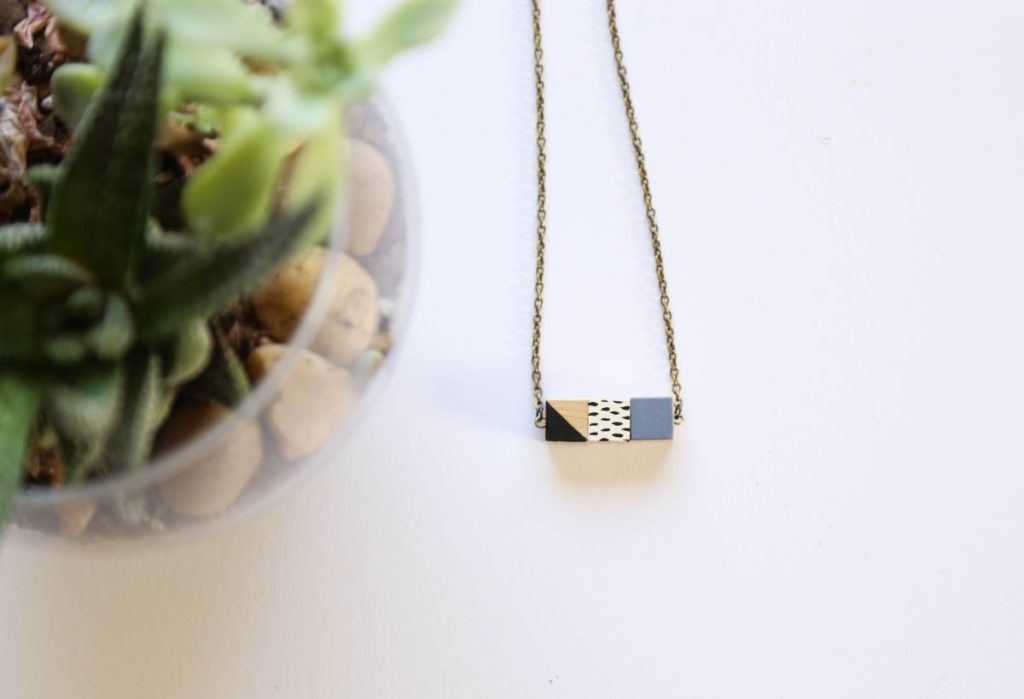
Paint the wooden cubes with whatever pattern and color you like. When the paint has completely dried, spray a layer of finishing spray over it to protect it. Once that’s dry, poke an eye pin through and create a round loop.
17. Mini Bottle Necklace
If you love the idea of mini pendants, you’re sure to love this next idea. This mini bottle pendant is an unconventional necklace, but we’re absolutely in love with it! They look like little bitty messages in a bottle, right?
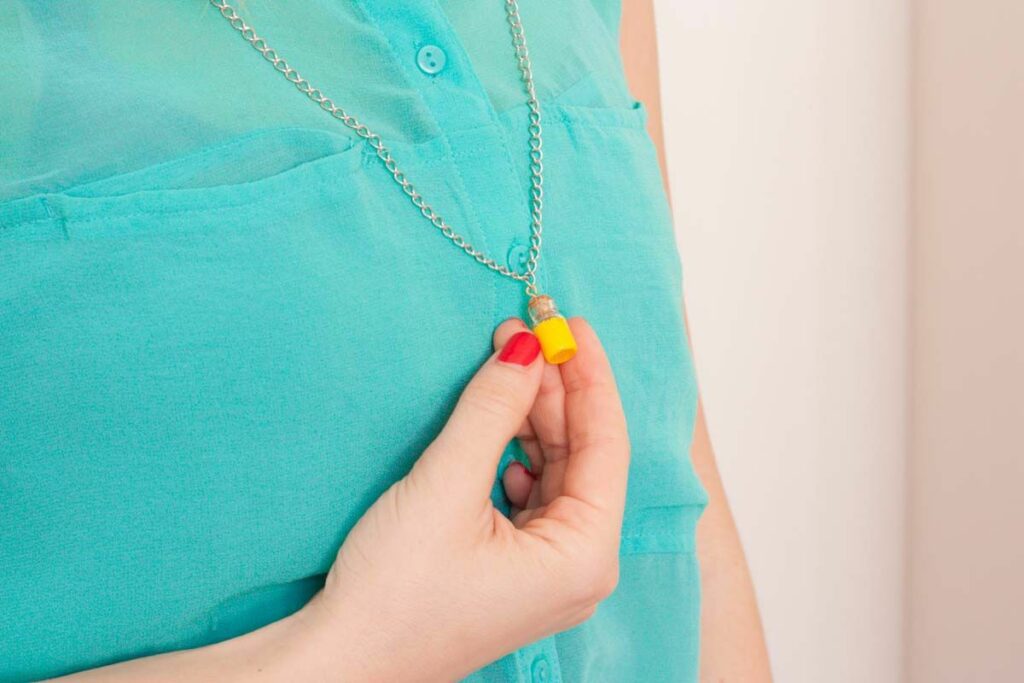
Firstly, prepare a mini bottle and paint it a vibrant color. While that dries, tuck an open-ended pin into the cork tap; be sure that it comes out the other side so you can cut off the excess and bend it, so it doesn’t slip off.
18. Wine Cork Necklace
Wine corks are standard in most households; they are usually thrown away once popped out of their bottles, but it’s such a waste to throw them away. There are numerous DIY ideas that can turn them into useful things; in this case, it’s accessories.
Start by cutting the corks that you’ve collected into slices. Then, paint the corks in any color of your choice (or like you see here). Finally, attach eye pins to the corks and add a chain to string them all together; you could even add extra elements to give it a sprinkle of sophistication.
19. Rope Choker
Like wine corks, rope has great potential in creating beautiful DIY items. It would be an absolute waste if it were simply shoved into trash cans. They can be used to replace conventional bows on presents and obviously, tie a few objects together.
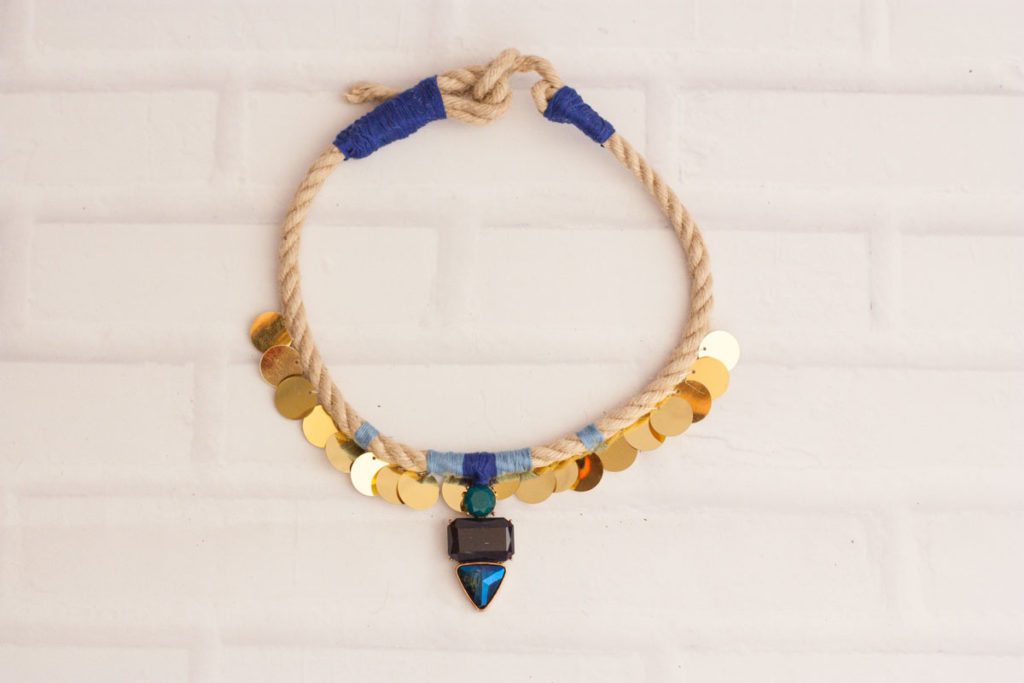
Not only that, but rope (of any material) can also make a mean choker that makes a bold statement. To do this, measure the length around your neck and cut the rope accordingly. Then, sew on pendants of your choice; make sure the stitches aren’t visible.
20. Charmed Leather Choker
Instead of a rope choker, give this very trendy leather version a go; it is originally from the ’90s but has reentered the fashion world. Compared to purchasing it from stores, making it yourself would seriously save you some money.
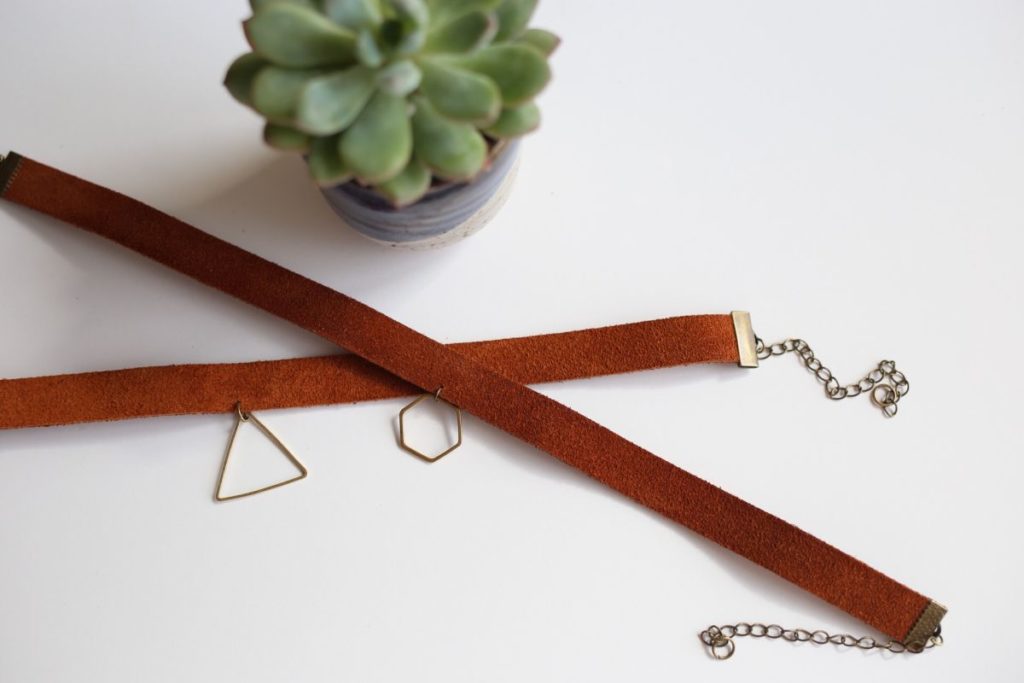
Measure a leather strip to fit your neck comfortably. After that, attach a ribbon clamp to the ends of the leather strip and complete it with a chain along with a clasp. Finally, punch a hole in the middle of the leather strip and add any charms that you like.
21. Glass Lens Necklace
If you wear glasses, you’ve experienced the annoyance of not knowing what to do with your old glasses; this is especially the case if your prescription keeps changing and you’re buying a new pair (or two, or three) every two years.
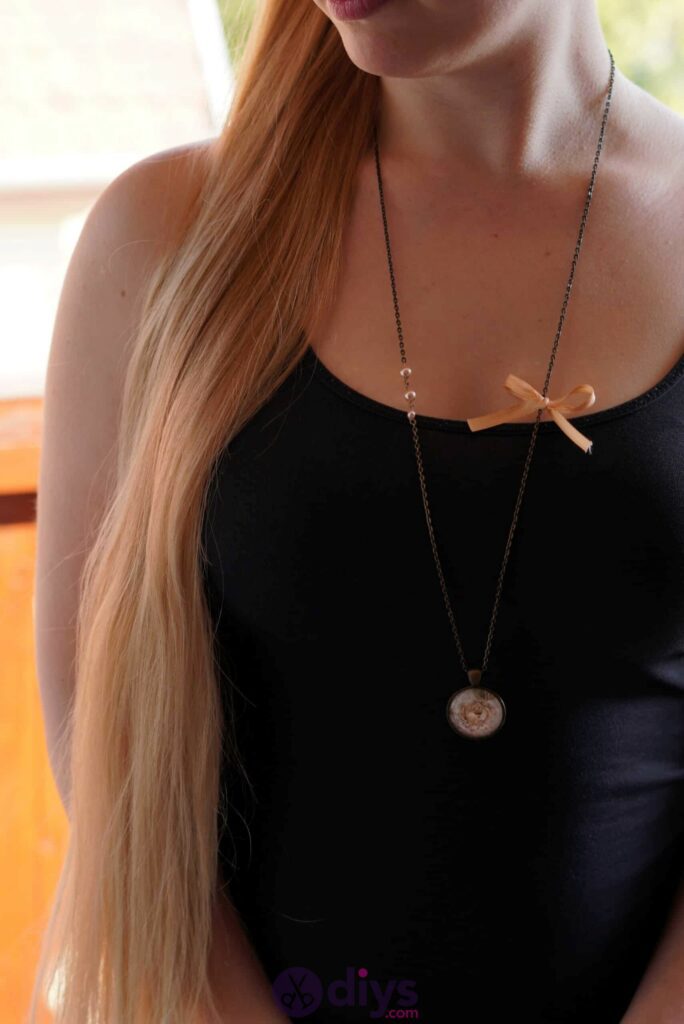
How about transforming all your old glasses into jewelry and gifting them to loved ones? Start by finding your desired pattern from floral scrapbooking paper and place your glass lens right on top of it. Trace and cut it out. Finally, glue both the paper and lens to a pendant base and attach to a chain.
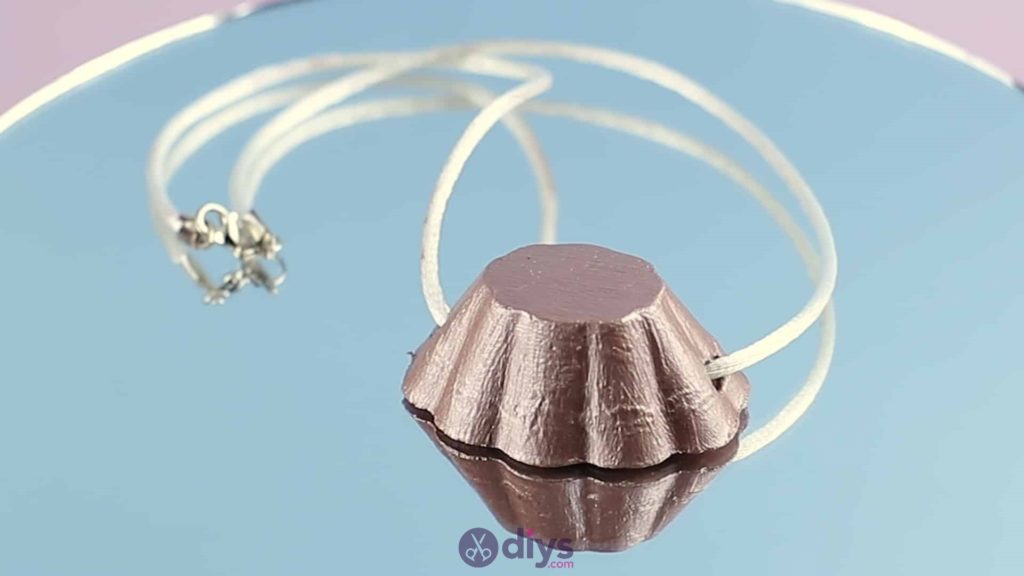
22. Concrete Necklace
This next DIY idea is one that practically costs nothing. Although it may not look as sophisticated as the other ideas mentioned above, it’s still a great activity to do with your kids or friends; we included this because who doesn’t love a great bonding activity, right?
Start by adding water to a DIY fine particle cement powder and mix it well until it’s lump-free. Then, make a cardboard mold. Next, add the cement mix into the mold you’ve created; be sure to leave a hole. Finally, de-mold it and thread the cord.
23. Heart and Star Necklace
This very chic heart and star necklace can be made out of concrete. For this, you can create as many hearts and stars as your soul desires. It’s another activity to do with your kids as well as your friends.
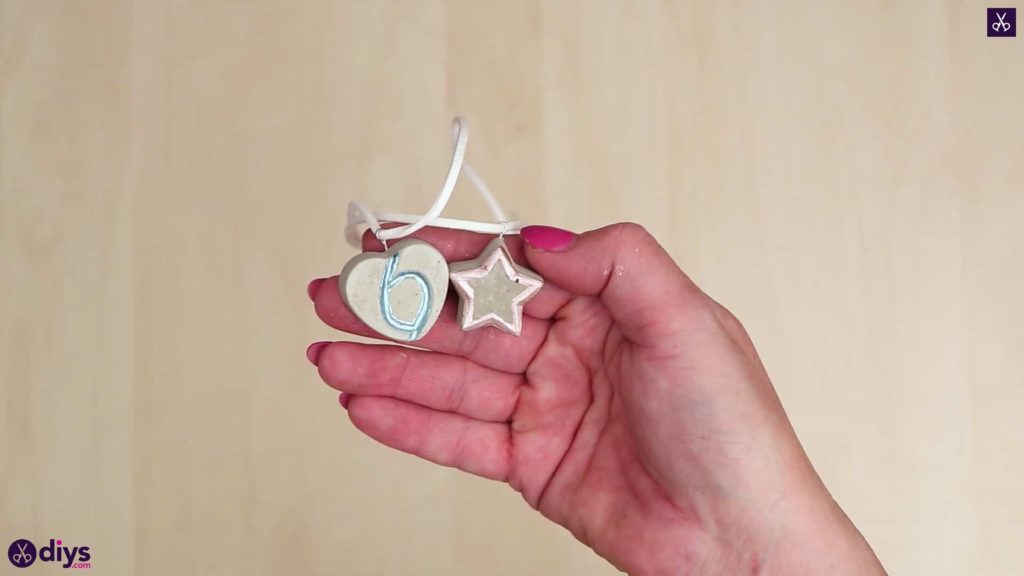
Begin by adding water to a DIY fine particle cement mix and stir until there are no lumps. Then, fill your molds. Next, place pins in the cement to make loops that you will attach to the chain or rope. When they have completely dried out, remove them from the mold, and decorate each charm.
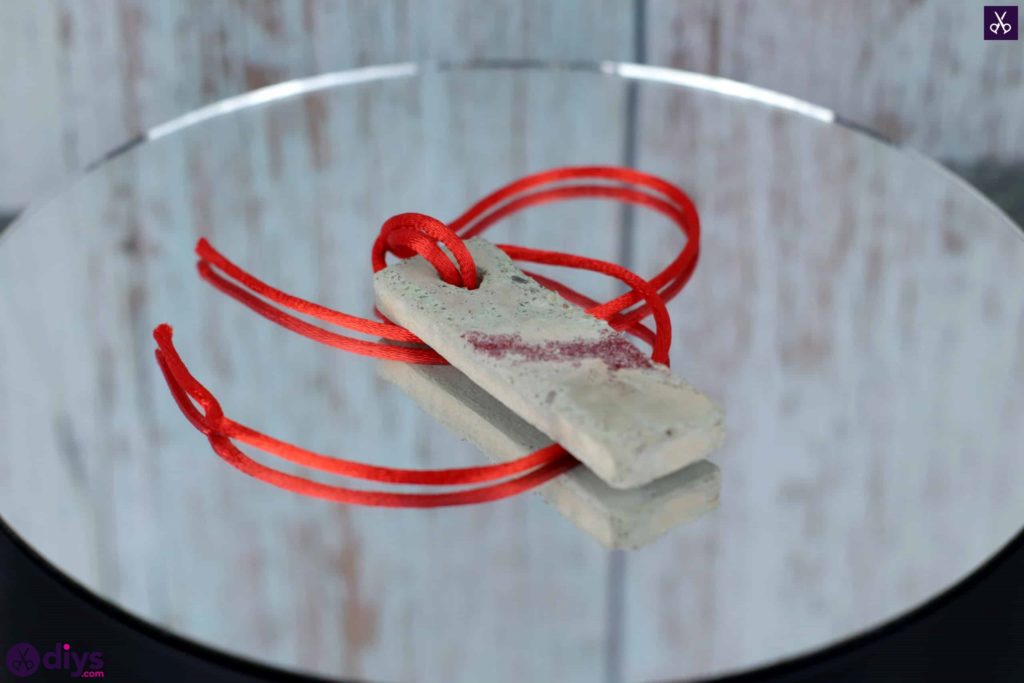
24. Concrete Pendant
If you have leftover necklace chains from previous DIYs or broken pieces, here’s how you can put them to good use. With concrete, you can create multiple beautiful pendants you can switch depending on your mood. These pendants can even be used on bracelets!
You’re going to make more lump-free cement mix. Pour the mixture in molds of shapes you want your pendant to be, poke a straw in the top for your to string chains through it afterward. When the cement has dried, de-mold, decorate, and it’s ready.
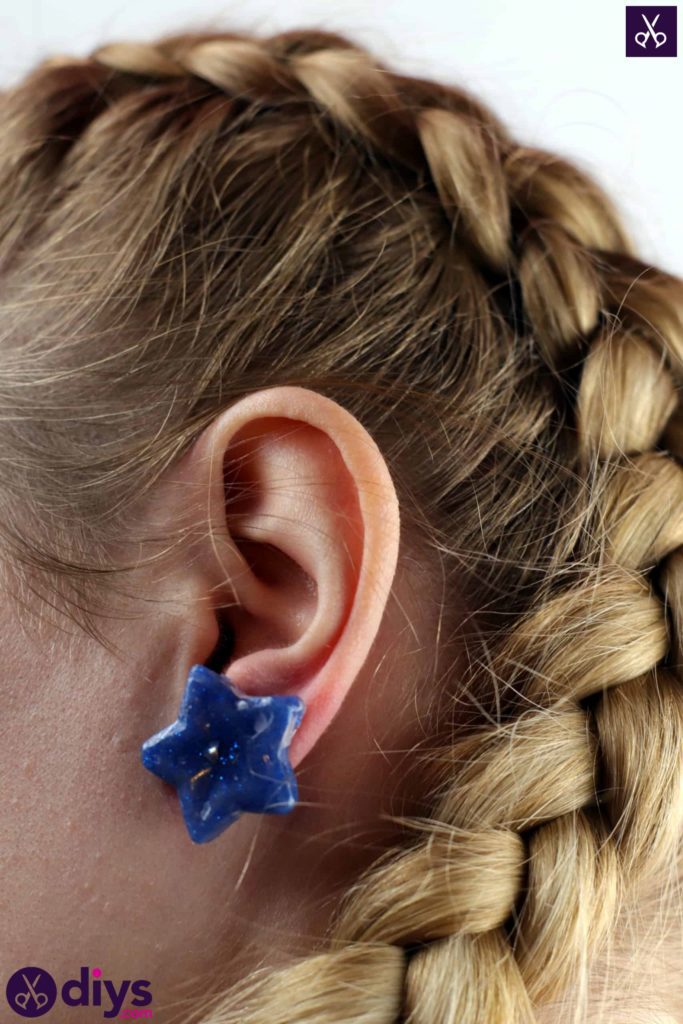
25. Glittery Earring
We’re moving on to earrings which are great for when you have your hair in an updo. Often, your face would seem empty with these styles, and earrings tend to draw people’s attention. You can really make a statement with custom pairs!

These glitter earrings help you stand out and are simple to make. Use some polymer clay to create an earring shape that you like. When you’re done, dump glitter all over it. Finally, attach earring hooks, and you’re ready to impress anyone you meet!
26. Dangly Earrings
One way you can make a statement is by wearing dangly earrings. They’re suitable for when you have your hair pulled back or in an updo – or with any do! Additionally, they’re trendy nowadays, so hop on the trend train with this simple DIY!
Once you decide on your shape, it’s easy. Combine wire and beads to give your earrings more texture. Now, start beading the strands; you could use colorful beads for a pop of color. Finally, tie a small knot to prevent the beads from falling.
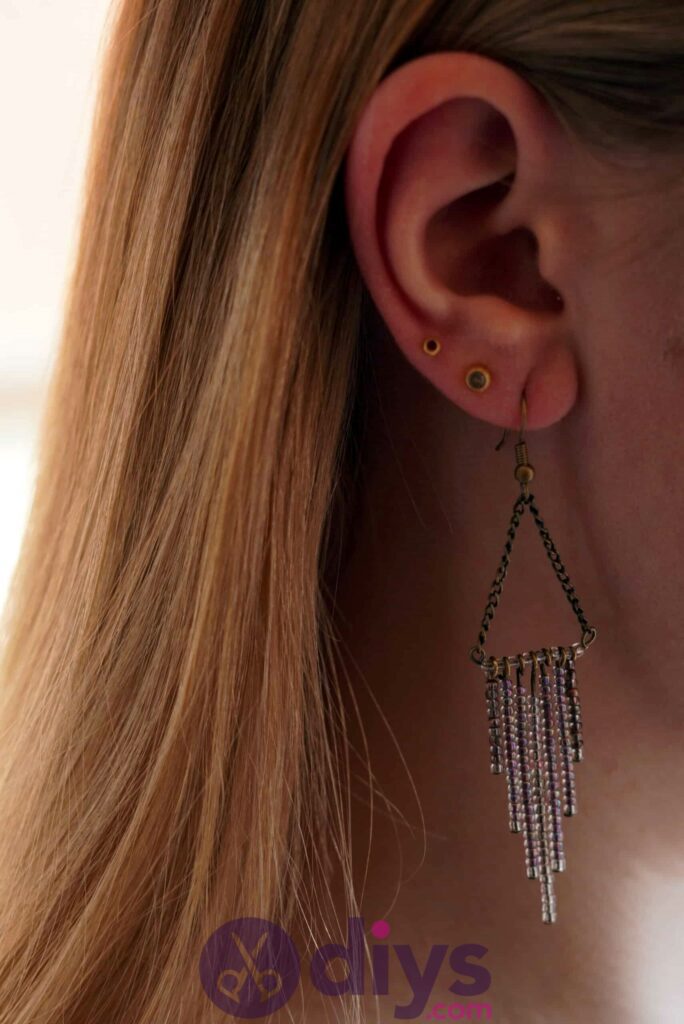
27. Chain Fringe Earrings
Alternatively, you can substitute dangly beaded earrings with chain fringe earrings; gold chains are classic and make you look sophisticated. These would look ridiculously beautiful with fancy dresses; you’d definitely be the center of attention.
Simply cut pieces of chain in varying lengths. Then, lay the longest piece in the center, moving outward as the pieces get shorter. Here, the chains are attached to a large hoop, which can serve as the part you stick in your earlobe.
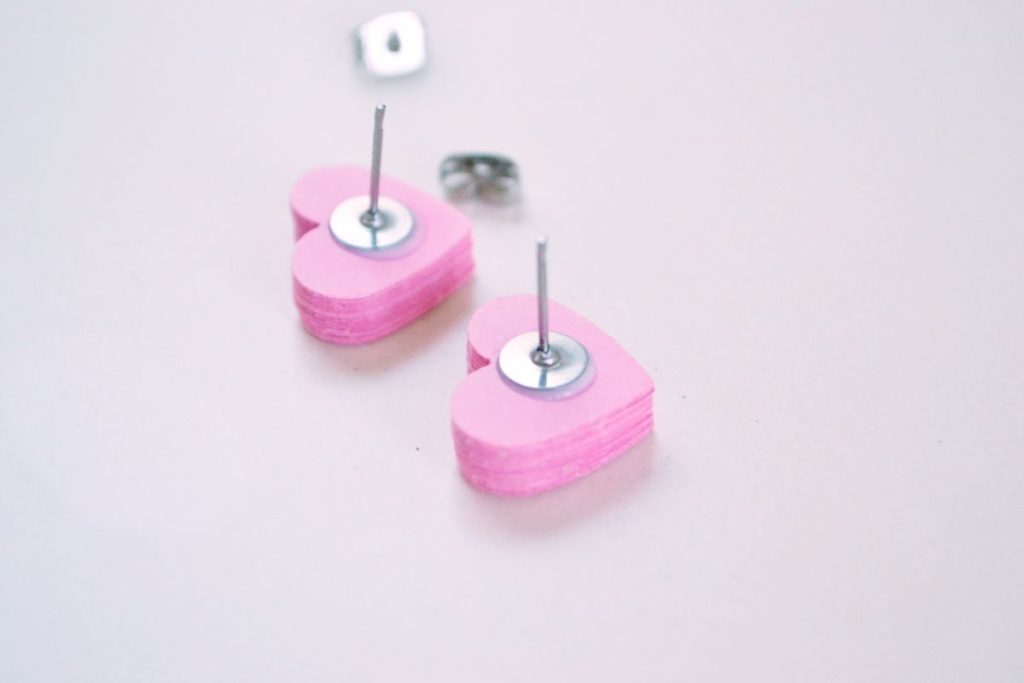
28. Glue Gun Earrings
Another simple way to make earrings is with glue; DIY-ers would surely have glue guns at home, but if you don’t have one, they are widely available at hardware stores or online. So, get your guns ready for this next earring DIY.
Firstly, heat your glue gun and put in a stick of glue. Fill two of your preferred shaped silicone form shapes with glue; fill it only 2/3 of the way. When the glue is still wet, smooth out the surface with a paintbrush and sink earring posts in them. When they’re dry, de-mold them and show them off.
29. Paper Earrings
Another thing that everyone most probably has in their home is paper. The reason we’re mentioning this is because you can actually create a pair of cute earrings with just paper. If you want more earrings, simply create several pairs with just a few sheets.
Use hole punchers of your desired shape to punch out 12-20 pieces for each earring. Glue the pieces together and use a dab of hot glue to place the earring back. That’s all you need to do to create these cute accessories.
30. Wine Cork Earrings
Since we’ve suggested a wine cork necklace earlier in this article, why not create a matching pair of earrings to go with it? Matching jewelry sets are a great gift for your family and friends; handmade ones are even more meaningful.
Just like before, thinly slice a wine cork and paint the pieces in your preferred color. When the paint has dried completely, attach the cork slices and then to an earring hook; you could add gems for it to match the cork necklace.
31. Bohemian Style Earrings
Anything bohemian is super in style right now. Whether it is home design, accessories, or even clothes, it is easy to spot bohemian-inspired things; they have unique patterns and elements that show off your personality. What’s more boho than DIY?
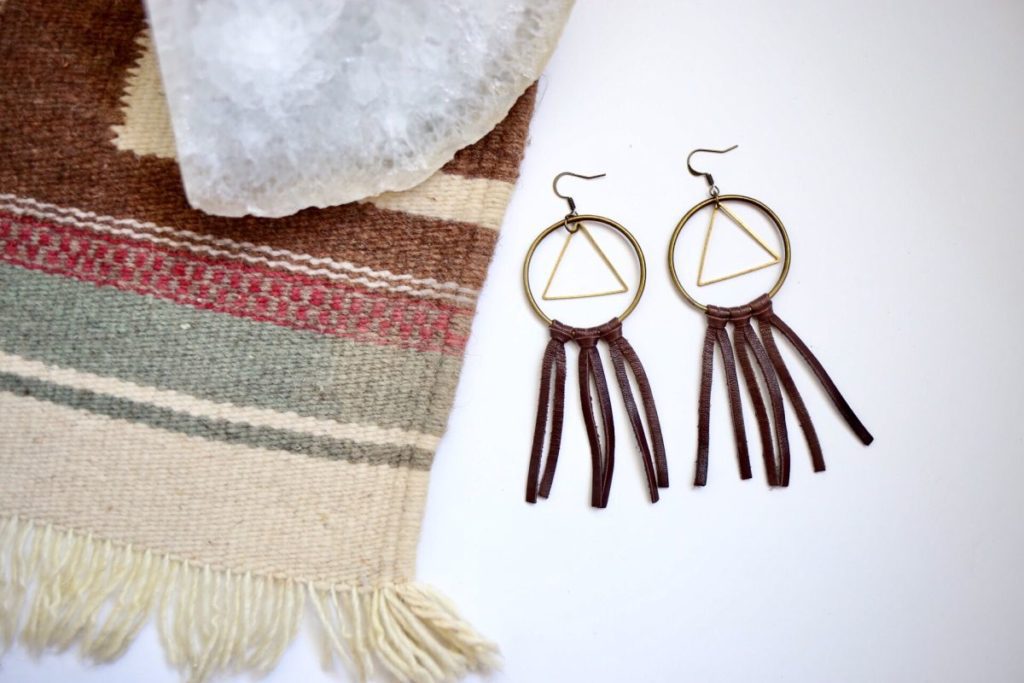
Attach a leather cord to a 2-inch hoop by folding the cord in half and slipping it underneath the hoop and through the loop. Repeat this step three times. Then, add a charm to the top. Finally, stick an earring hook to complete this DIY.
32. Minimalist Bracelet
If earrings and necklaces aren’t your thing, then perhaps you can try accessorizing with bracelets. Wearing bracelets is a great way to add a little sparkle to your outfit without drawing too much attention (unless you like the chunky kind).
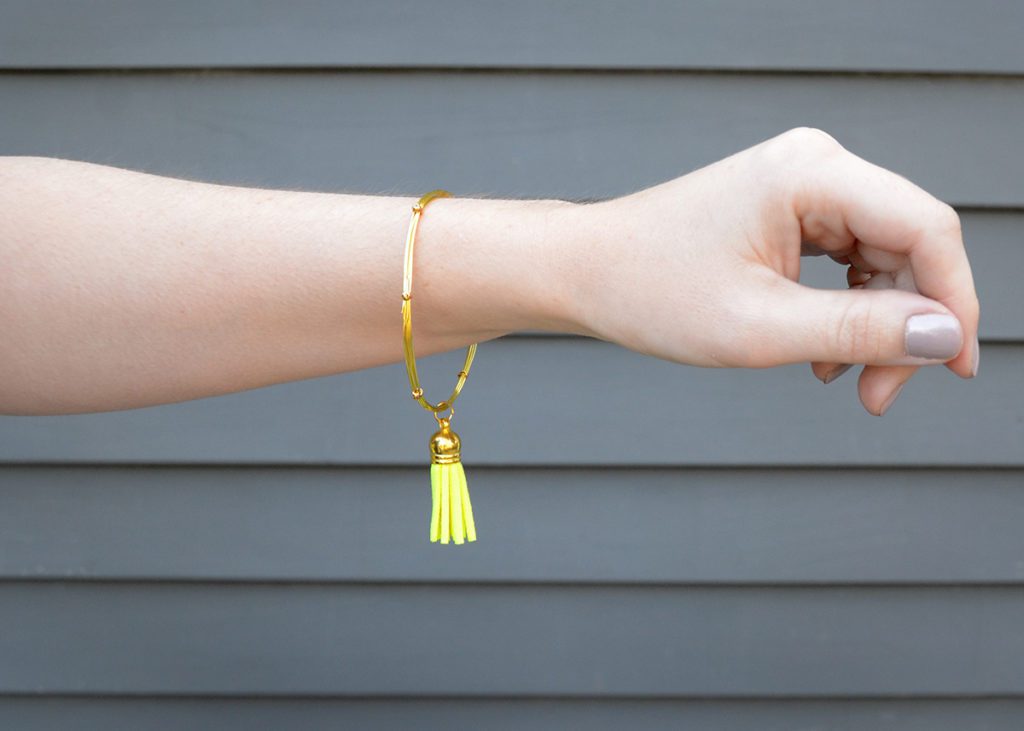
To make a minimalist bracelet, go ahead and wrap some gold wire around a mason jar a few times. Then, wrap crimps around all of them at evenly-spaced intervals. Lastly, attach a tassel or pendants of your choice to the bracelet.
33. Simple Knotted Bracelet
Alternatively, you could create this simple bracelet that challenges your knotting skills, but don’t worry because it is still easy to make. This is a great activity to do with your friends or kids; you can turn them into friendship or mother-daughter bracelets!
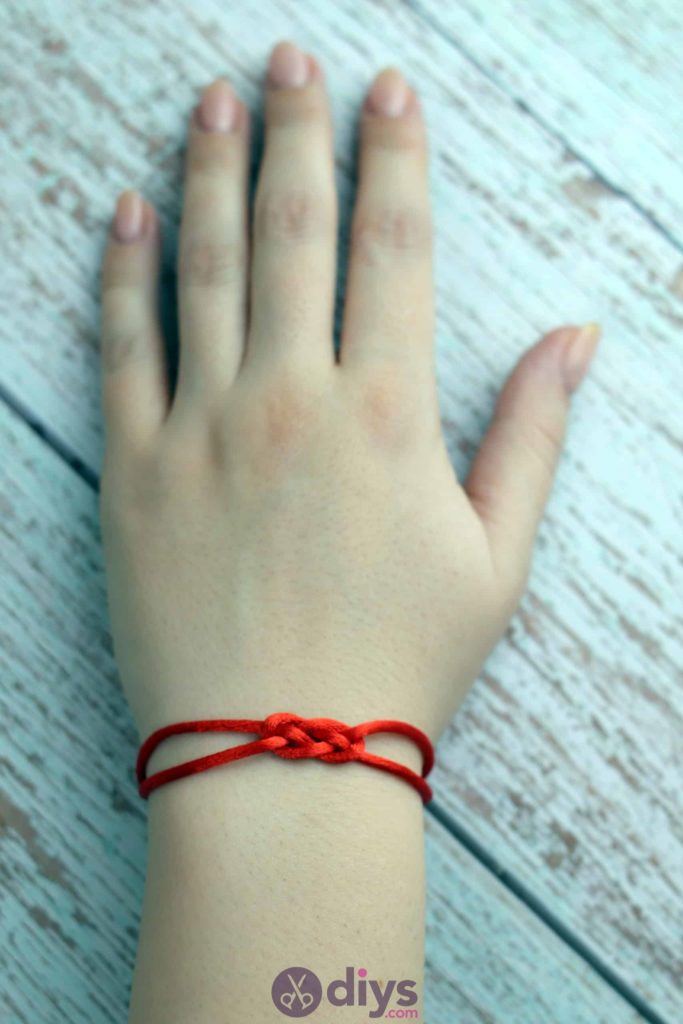
All you need are ribbon clasps, satin macrame cord, scissors, pliers, and a little bit of patience. Simply measure out the length of cord you need, follow the instructions to create a Celtic knot, and attach the clasps when you’re done.
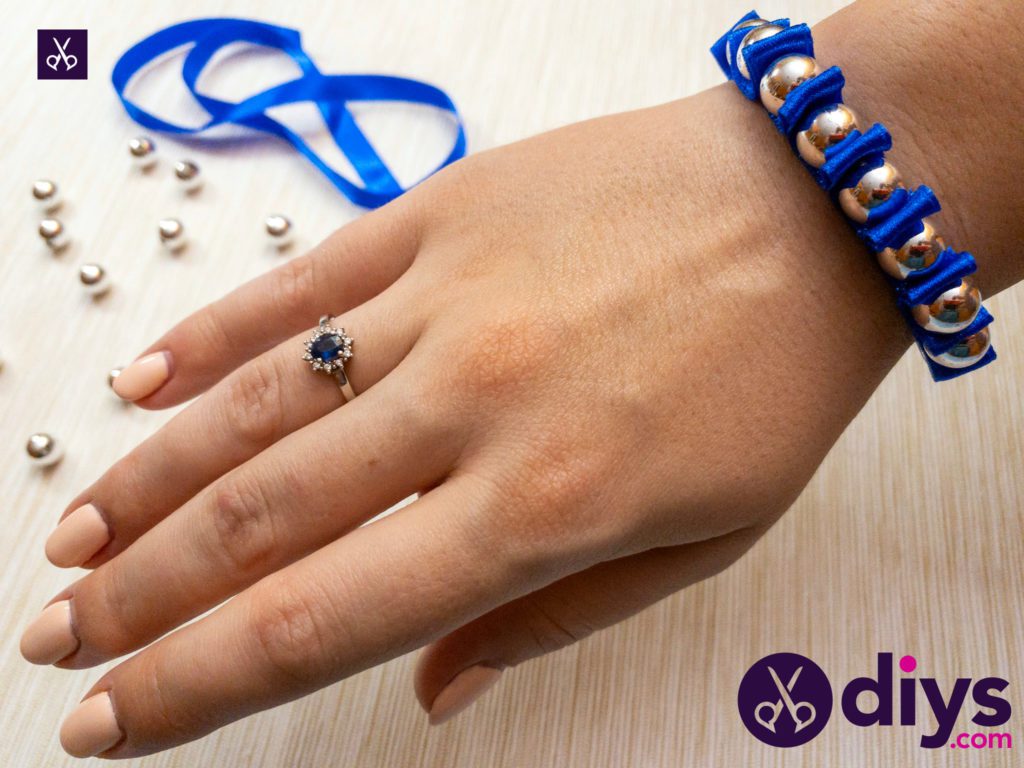
34. Wooden Tassel Bracelet
Another simple friendship bracelet to create with your besties is a wooden tassel bracelet. Tassels seem to be one trend that is here to stay, as you can see. We’ve already mentioned a few ideas that include them, and we’re not stopping there.
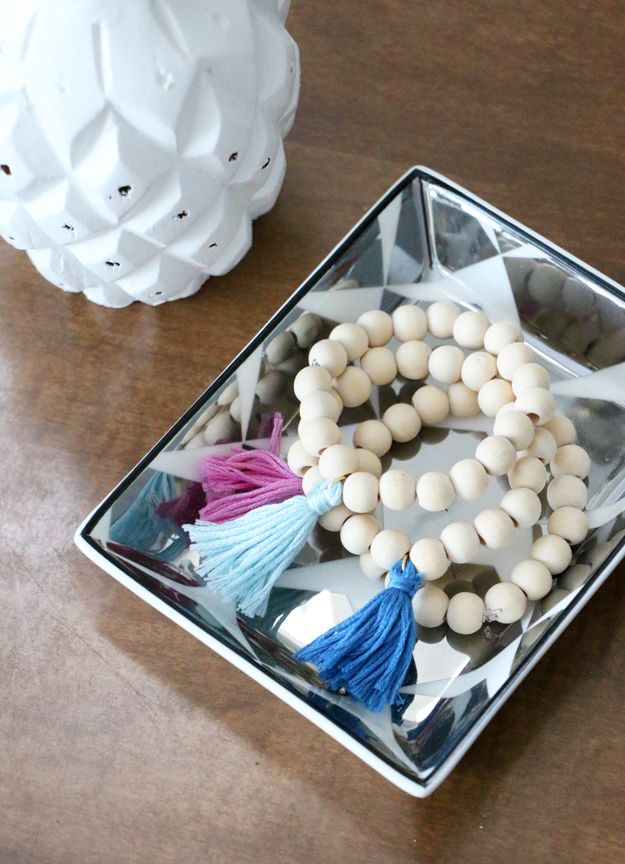
Measure a piece of stretch cord around your wrist and cut it accordingly, leaving six inches of excess. Now you can begin stringing the beads. Next, create tassels by folding pieces of string in half and stringing it underneath a jump ring and through the loop. Finally, clip the tassel in the middle of the cord.
35. Yarn-Chain Bracelet
This yarn-chain bracelet is an interesting texture, which why makes it so unique and eye-catching. Additionally, it is simple to make so this is another DIY project you can do with your kids. They would definitely enjoy some family crafting!
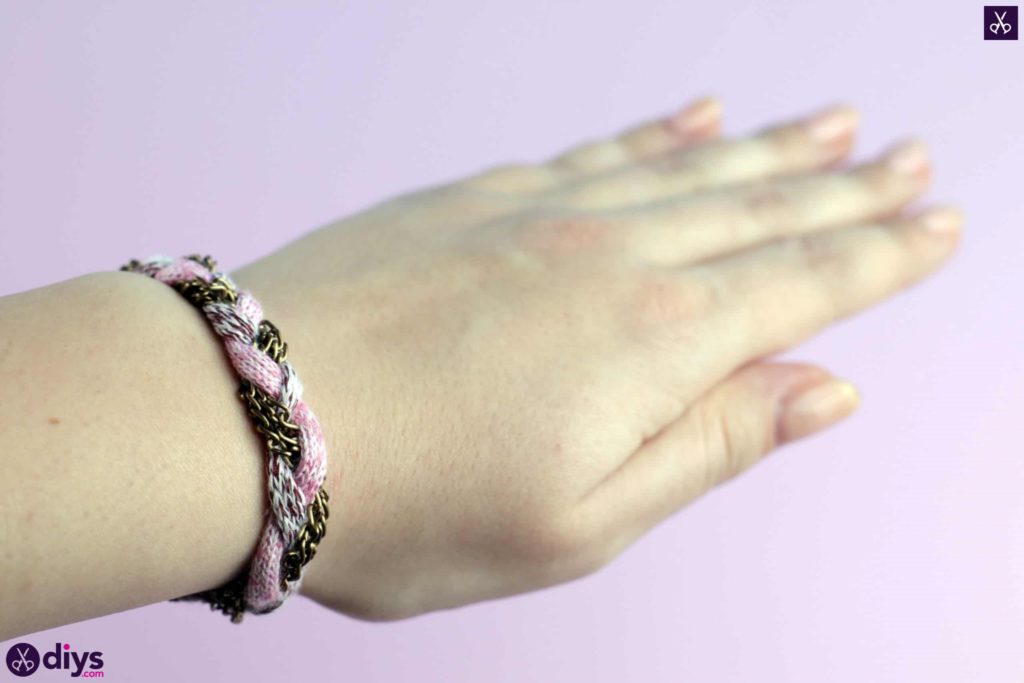
Start by measuring out a chain and yarn pieces of two different colors to fit your wrists. Then, use a ribbon clasp to clamp one end of your strings; be sure to close it tightly. Now you can start braiding. Trim off the excess and clamp with another ribbon clasp when you’ve reached the end.
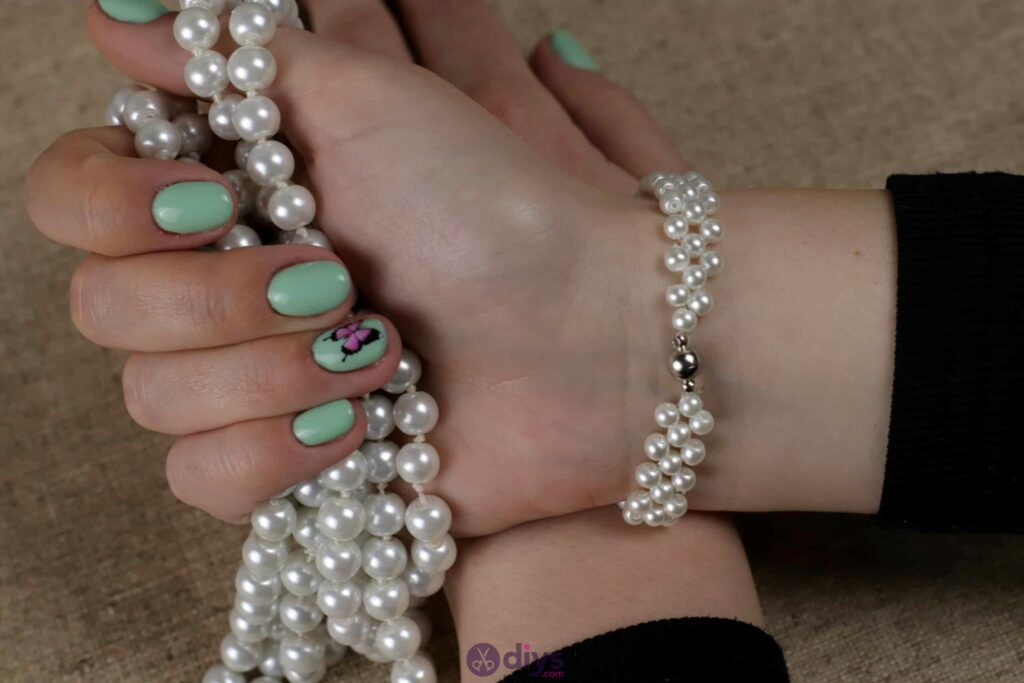
36. Pearl bracelet
This next bracelet DIY idea is a bit on the bougie side of things as it requires pearls. This is a great accessory to pair your fancier dresses with; you’ll definitely impress everyone at your dinner parties with this pearl bracelet.
Simply cut yourself a length of ribbon that is three times the circumference of your wrist. Then, fold the ribbon in half at about 5 inches from the end, the needle through both layers so that it sticks out, and place a bead on the needle; repeat on folding and adding beads. Finish off by taking the needle out and tying a ribbon.
37. White Beads Bracelet
The idea mentioned above may be a little complicated to perfect, but don’t be discouraged because we have a simpler and more elegant project you can do instead. This is a simple pearl bracelet that would practically go with any outfit you have.
Again, start by measuring a piece of nylon that fits your wrist. Then, pass one end of it through the loop on one side of your clasp until it fits in the middle and secure it there with a double knot. Now, alternate between dropping one bead on both lines and one bead for each line and finishing with another clasp.
38. Pearl Leather Bracelet
This pearl leather bracelet is a more straightforward and minimalist option; it’s a much more subtle accessory that wouldn’t attract much attention to your wrists like the other two bracelets would. As a bonus, it is the easiest to make too!
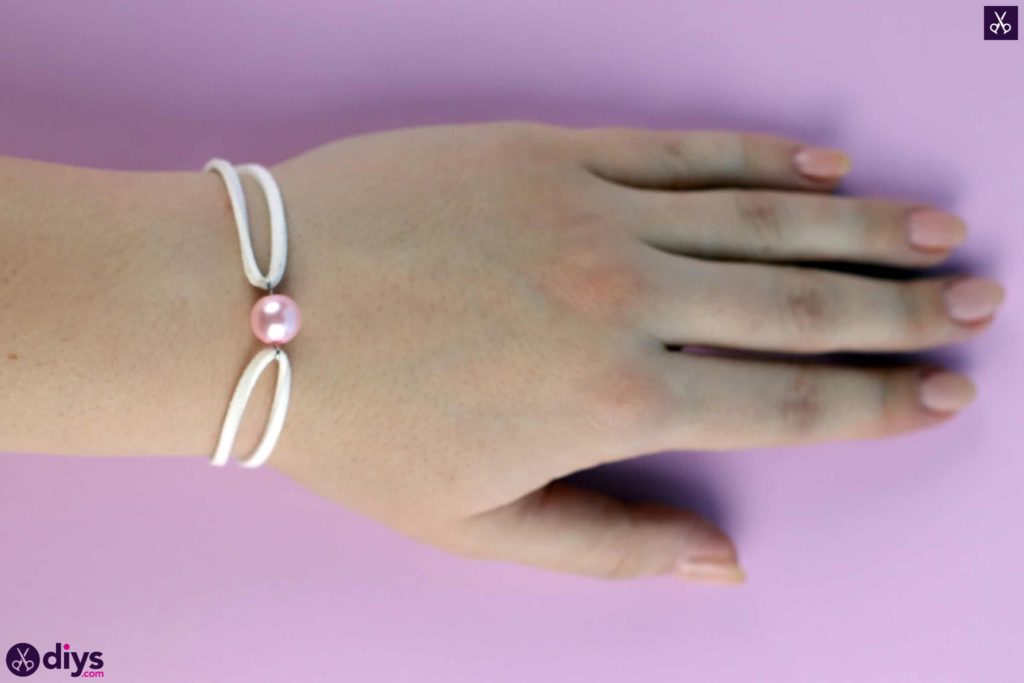
To start, cut two pieces of leather thong; fold the first piece in half, use a ribbon clasp and clamp the ends. Repeat for the other piece. Then, attach a wire to the pearl, curl one end of it, slip the thongs in and close off the wire.
39. Color Block Stone Bracelet
Recall the half-moon stone necklace that we suggested earlier in this article? This is similar to that, but instead of clay, we’re going to be using stone. This can be turned into a matching set for the necklace mentioned above, which would be a great gift.
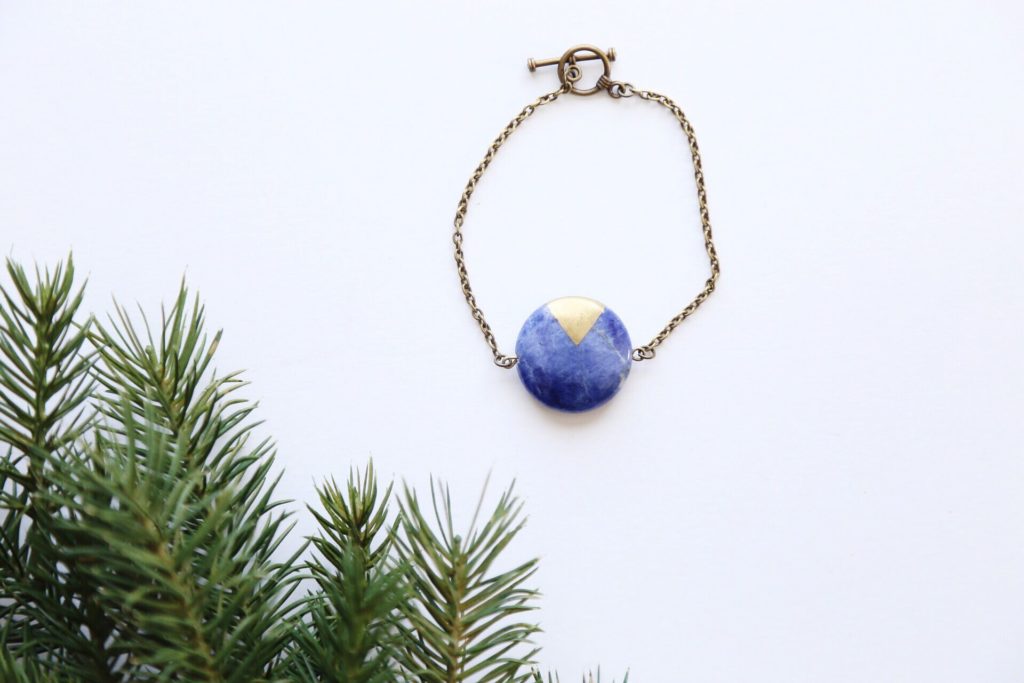
Create any design that you like with tape on a stone disk bead and use a paint marker to fill in the design; remove the tape once the paint has dried. Now, put a wire through the stone disk bead and create a loop at the end of the wires. Finally, attach a chain to the loops created.
40. Eco-Friendly Bracelet
Since toilet paper rolls are usually thrown away, we’re actually doing the environment some good by recycling, not to mention that it basically costs nothing. So, if you’re looking for a no-cost way to create beautiful bracelets, we’ve got your back with this one.
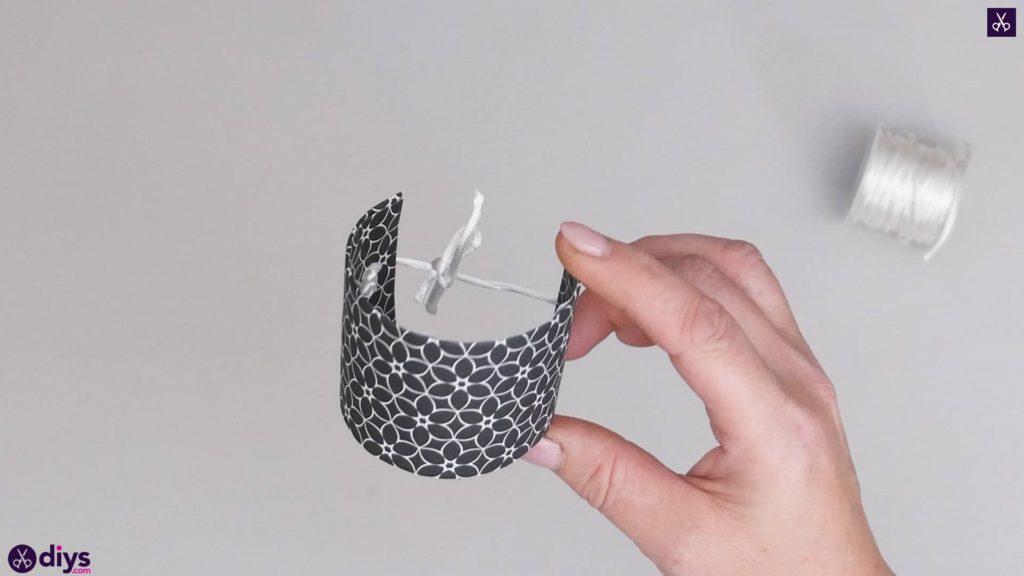
Decorate the toilet paper rolls you’ve collected with colored paper or paint and cut out a section from it so that it leaves a Pac-Man shape. Then, tie the open-ended sides with a piece of string to prevent it from slipping off your hands.